Saturday, February 16, 2013

DIY BJD Holder/Sleeve/Thingamabojiggy (??!) - a sort-of-tutorial that isn't really


Clover is in her coffin :P

There was a gathering yesterday for doll owners in a facebook group I'm in, but I had no proper bag nor face protector for Clover :( Since I'm always broke and not that many readily available items catch my fancy (especially if it's something i -think- i can make :X ), I told myself that if I could make a bag/protector for Clover in time for the dollmeet, I'd go :) 

Many helpful owners chipped in with suggestions of using a clean towel, bubble wrap, shoe bag etc, and although I didn't own the latter and am not short of clean towels & bubble wrap, having no face protector meant I risked crushing her eyelashes :( 'sides. i was itching to stitch, having held back due to time constraints and the fact that my new machine will be arriving on MONDAY OMG OMGOMGOMG

it's been a long time since i exercised any sort of 'planning muscle' in my brain. first 2 drafts of how i wanted to construct the holder didn't seem to work, and after fiddling about with some ideas, went with the simplest. decided to modify as i went along :)

Top considerations for me were:
- compact, and fit in most of my bags
- sturdy so she doesn't flop around
- protect her face, especially her eyelashes
- waterproof if possible, but that was dependent on materials on hand
- easy to store/remove doll
- machine washable

here're the materials i planned to use for this project, clockwise from top left:
- Daiso material, it feels sleek and possibly waterproof, think it is nylon. has been part of my stash for at least 2 years, loved the print, am SO GLAD it finally got put to use
- white lightweight fabric purchased on the cheap for drafting prototypes, might be polyester
- batting for quilts, with interfacing for stiffness
- 1.5mm thick plastic (polypropylene?) sheets (Daiso)
- green ribbon was some random remnant i had kept and it seemed to work with my fabric choices, but did not wind up using -_-"

 just a note: I hadn't realized this one had the interfacing until i got home and examined the package. which is fine by me, wanted the added stiffness for the part that didn't have the board insert ^ ^ quilting fabric could possibly be much cheaper elsewhere, but i didn't want to travel again and small amounts suit me just fine until i need more.


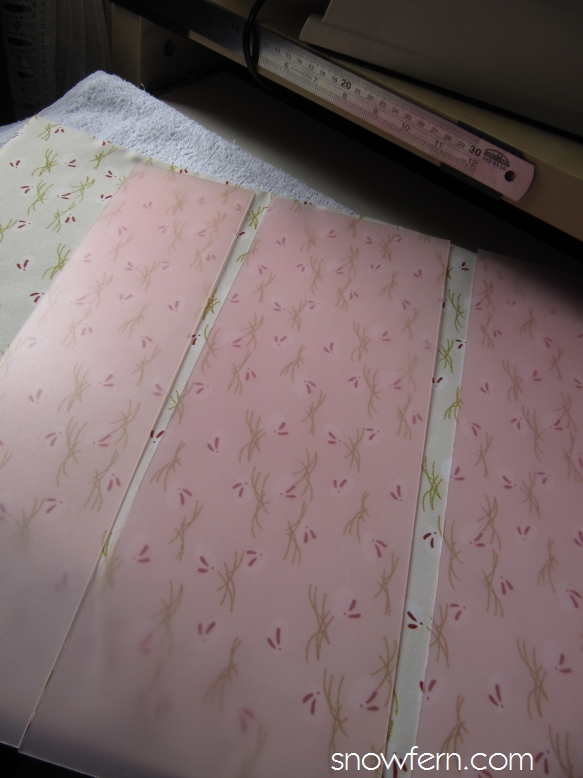
although these are the measurements i started out with, i modified along the way i.e. shortened the length. used a pair of gardening shears to cut through the plastic as it's pretty stiff, and from past experience, hell to cut through with a penknife. that and i really didn't want another piece of flesh missing from me :S

(not that it's a far removed possibility with the shears, but i digress)

 test fit the pieces, yay they work~

looks too small?

 newp! it's all about perspective :P

size is good for use with my favourite grocery bag!
(given to me by my cousin, she had entered in a local magazine competition and her design won!)


test fit again~ didn't feel like doing too much math and measuring


estimated the length of batting required, which came up to approximately 17 inches across and 14 inches wide. i planned to stitch across the batting on the sides to hold it in place before i turn the fabrics inside out.

 fabric marker works great on the batting

added about an inch around all sides, cut out my printed fabric, then did the same for the white (lining) fabric. do take note which direction you'd like your prints to be in by test wrapping again if need be.

totally forgot to take pics of how I layered the fabrics as I was rushing this project.

batting
lining
printed fabric (print facing up)
batting

at this point, it might be a good idea to attach any ribbons or whatever else you might choose to tie up the bundle if you so wish, in  between the lining and printed fabric. I opted out of this as the idea of fiddling with ribbons just seemed like too much work each time i use the 'pouch'.

folded in the side where i would be slotting the plastic pieces in. at this point i hadn't yet decided if i wanted to stitch over the edge yet, and since i had deliberately aligned the material such that it wouldn't need to be hemmed (no fear of fraying) i figured i could leave that decision till the end.

for neater results, i always iron my fabrics and rough hand-hem (don't know the actual term?) rather than use pins. i think this extra effort is especially important when sewing smaller pieces, since 
a) crappy machine,
b) n00b at miniature sewing,
c) rusty sewing skills :(
for the two sides, i stitched on top of the batting to secure it in place

and because i wanted a less puffy sides, the top (bottom?) edge was simply stitched across the 2 fabrics, as closely to the batting and using the edge as a guide

my corners looked something like this (yeah i ran over the last few stitches again out of habit)

i didn't have a hemming/serger foot, so i just did a zigzag stitch around the edge and trimmed excess fabric. not sure if this actually would help reduce fraying, which didn't matter anyway since I finally decided to do a once over stitching around the perimeter.

turned it out to reveal..............that i had spent 2 hrs to sew a stupid puffy rectangle.

XD

forgot to mention, i snipped the corners at a 45deg angle to the edge of the fabric(as close to the stitches, but take care not to snip away the stitching) so that the corners would be sharper after it got turned out. more experienced uhm seamstresses (??) probably know this already.


ANYWAY. moved on. again, no strict measurements, so i placed my plastic pieces inside, giving it a little bit of allowance and roughly stitched in as straight a line as possible so it would act as a guide

 at this point i had already ironed and stitched over all edges (including the slot edge, though that was done like you would stitch around the mouth of an opening etc hope you understand what i mean


 rough stitching with contrasting thread for easy detection for removal later

 keep going.....

PEDAL TO THE.....ceramic tile floor? XD
(man my jokes are lame, not that it matters if nobody understands me.)


OKAY! time to insert the plastic pieces! i snipped off the corners so it wouldn't snag
(oh yeah remove the rough stitches before you insert mmkay, as usual forgot to take pics in sequence sigh)


taran taran~! almost done! the plastic rests pretty firmly against her forehead, protecting her faceup and eyelashes ^ ^ (though i really should remove that clip lest it scratches her face :X)


cos i started losing steam at this point (was close to the 4 hr mark at 1pm -LUNCHTIME- and I had woken up at 5 that morning), i decided to just make 2 elastic bands to hold everything together. simply measure around the bundle + doll, lighter seal the frayed edge, overlap by approx 1 inch (btw i used a 1" elastic waistband) and stitch.

BE CAREFUL NOT TO STITCH ON THE THICKER PARTS/EDGE OF THE ELASTIC LIKE I DID my needle snapped into 3 pieces :O gave me a rude shock it did.

(speaking of which, i'm also losing steam on this post, took almost 1.5 hrs to do it sans breakfast zzzz)

This tutorial could probably apply to any sized doll, provided you can find sturdy enough material, or maybe cut 2 pcs of the inserts instead of 1 whole piece, etc etc. Cardboard could be used in place, since it's constructed to be removeable before wash.

Apologies if you thought it was going to be more comprehensive or precise with measurements and such, but as you know, i'm all for adaptibility and would rather pick up techniques than measurements :P

Hope this will be useful to some of you, do share with your friends (I have some buttons greyed out below this post, you can use those! wonder if it ever gets noticed) etc etc if you have found this interesting :) Would appreciate credits and a linkback if you ever decide to make one of your own!

~~~~~~~~~~~~~~~~~~~~~~~~~~~~~~~~
Additional suggestions from friends from the dollmeet:
- add handles (would be handy, and could even add a handlewrap thingy to hold it together!)
- velcro (i hate the sound of velcro ripping and avoid it like the plague)
- make many and stack up like a honeycomb (LOL how many dolls do they own OMFG!>?!? but LOVE this idea!!!! can you imagine?!?!? how amazing that would be!!!)

Personal notes:
- add elastic strap to base to secure doll before wrapping up
- lace trim to sides
- possibly push buttons to secure top flap, but elastic band might be better depending on how fluffily clothed doll is
- since plastic boards were used, could simple sew across the edge to secure in permanently, but i prefer to have an option to remove it for versatility. wonder how the batting would hold up with constant removal. 
- re: above, try for more fabric layers to protect batting layer?!?!?! thicker is okay too for added protection!
- man i remember i had so many other fabulous ideas but right now i think i need breakfast


Friday, February 15, 2013

Quick and easy DIY Coffee Table for 1:3 or 1:4 BJDs

just a quick and simply DIY coffee table suitable for 1:3 or 1:4 BJDs. I threw this together in a few minutes!

Here's what I used:
- 8.5" x 8.5" Ferrero Rocher box (or any other plastic candy box)
- 5" x 6 1/8" x 2 1/4" clear display boxes (from Daiso) X 2 pcs

Optional
- fabric as tablecloths or placemats

This is the empty Ferrero Rocher box :D I forgot to take a pic of the insert (in the pic on the right) which can be easily flipped over and re-used as sort of a matte gold table covering if you prefer.

I used the base portion as it is flat and has no decal.

These are the clear display units purchased from Daiso ^ ^ Flip them the other way for a taller table :D

Place Ferrero Rocher box cover on top of clear plastic displays, TADAH! there's even storage for books or ornaments :D

There's a print at the base, indicating the manufacture/expiry date, which can be easily cleaned with Rubbing Alcohol (any pharmacy should carry it). I've not tried other removers, perhaps nail polish remover might work, or even some brands of baby wipes, but i'd test it first on perhaps the top cover of the box in case it 'eats/clouds' the clear plastic.

TADAH! quick and simple coffee table for your BJDs :)

oh btw, i didn't get any fancy photography thingy. it's just a plain white translucent umbrella from Daiso to help diffuse the light! I RUVS IT.

Lamp is a work lamp from IKEA.

What's the difference you ask? Left (top?) is through the brolly, right (bottom?!) is sans brolly. I prefer the softer effect ^ ^

(any bluriness is caused by shaky hands from a tired 'photographer')


for the 'bench', i was rushing through Daiso to pick up some teriyaki sauce, and came across this! I think it comes in pink and green too, but I like white :D it matches everything! Flipped the mesh part over and pushed the 'legs' in through the back to get an instant seat for 1:4 teen/1:4 child (YoSD)!


Forgot to take a proper pic of her on the bench, and i'm tired, so here's an instagram photo of how she looks with the table in her room :) Lighting is a cheap,  battery operated bookshelf lamp (OLEBY) from IKEA :D


I've also made a 1:3 crushed ice drink, am slow with listing the drinks as I'm quite allergic to the resin, and can only make about 2 drinks before I start breaking out in rash on my face and arms. Will be making some slushees, and more iced sodas when my 'ice' stocks arrive ^ ^

Remember to 'like' my facebook fan page for immediate updates on when I blog, and list new items :D

Hope you enjoyed this post, and show me if you made one too!

(do you all think it's better if I switch the comment system to that using facebook comments? let me know!)

oh and btw, i've set up a customer gallery page :) Big big thanks to my customers for taking lovely photos/videos of my work! you can view them via the "Customer Gallery" link at the top of my page (the navigation tabs) or via this URL:

Thursday, February 14, 2013

Chest of Drawers for BJD (1:4, MSD scale)

This was a project I had meant to tackle more as a personal accessories box for myself. It used to hold my hair clips, rubberbands and rings, basically the only accessories that I wear, though I have stopped wearing rings after I started working with clay. After Clover arrived, all her little clips and hairbands needed a storage space, not to mention the spare clothing I'll eventually make for her :P


This is what it used to look like in its past life XD My father had bought some mooncakes about 2 years ago, and I told him I would like to keep the box for my little trinkets. It has not seen that much use, and when I started fussing about looking for a good place to store Clover's accessories, I suddenly remembered that this would make a perfect storage space! Whipped her out of storage and plonked her against it to check if the height would look good/to scale. It does!!!


I went to work on this on CNY's eve, when I had an opportunity to in between preparing for reunion dinner. Took apart the box, which was relatively easy as it was held together by, i think, latex/shoe glue or similar. the trickier bits were the embossed paper that wrapped and held the box together. i had contemplated painting it, but me + paint = disaster waiting to happen. so i tried my best not to cut myself. *tried my best*. -tried my best-. you'll see why later, i hope you aren't squeamish :P

it was a frustrating and time-consuming process though, I had thought to myself many times that it might have been easier to scratch build a chest of drawers, but the process revealed to me how it was constructed, so that was a necessary evil.

 had a stash of scrapbooking papers, and back then, green wasn't my fave colour, so I had left them virtually untouched. with Clover, I have a chance to use it all up XD

Decided to use doublesided tape for every single part of this project.  


wasn't too difficult, didn't need to take that many measurements either, just sort of 'winged it'. there were a few mistakes, but i didn't mind so much as this isn't for sale, and I don't think anyone else would care to take a closer look XD

stickstickstickcutcutcut....many hours later.........TADAH. looking good!


(btw you probably already know you can click on my photos to have a closer look)
((just don't look too closely ok))

I wanted to give it legs as well, so it would look like a real life chest-of-drawers, and not a pastlifemooncakeboxchest-of-drawers. Used some wooden blocks purchased from Daiso!

test fit! and thus concludes Day 1 of the chest of drawers.


although the shelving portion looked pretty good by itself, and because I had a slight run-in with the penknife, I was tempted to leave it as-is. But of course, I couldn't leave this unfinished. so I pushed on the next day while waiting for my cousins to visit.

((man. i think i run through at least 10 pcs of bandaids a year. which is a pretty good record methinks. hrm Asuka might have beat my record on that. or maybe Chun. HRMMM XD))

It took me a while to figure out what sort of drawer pulls to have. Often, when I have personal projects, I don't bother to go specially shop for materials, and try to improvise with my own stash. However, most of my stuff is for smaller scales, and after going through my boxes of materials, decided to go online and seek inspiration. just a quick glance at the first page of google images on 'drawer pulls' and immediately I had an idea of what I could make from scratch with some dowels and bamboo skewers! ^ ^

here's my jig, i don't have any fancy woodworking stuff, even my stupid plastic mitre is inaccurate and rather cumbersome to work with. rely mainly on a razor saw and lots of sanding.

also stuck a piece of sandpaper on one of the dowels that was to be for the drawer pull, so that I could sand the other part of the handle (the perpendicular one that attaches the handle to the drawer itself) down so it fits snugly (or as snugly as possible) to the handle. not pictured is the little pins i used....forgot what it's called, to help strengthen the joint?


(btw never ever ever work with sharps when you're tired! of course, I never ever ever heed my own advice.......and I'd run out of bandaids so I taped a cotton pad around my finger to staunch the bleed XD). for those who are squeamish about wounds, please skip the next photo :P

SQUEAMISH PEOPLE DO NOT....ah it's not that bad, THE DRAMA QUEEN STRIKES AGAIN

:P
I initially used just wood glue and that pin thingamabojingy, but i figured it wouldn't be strong enough to withstand my constant use, so I reinforced the joint with 5-min 2-part epoxy (you can get it at any hardware store).

used a hole punch + hammer to put holes in the front, another scrapbooking paper for the front (i even made sure to line up the design in the order it was cut from the sheet :P ) then used lego pieces to make sure the handles were all evenly set in place while the epoxy glue set. it's still kinda shaky as the holes were a tad large....will sort that out another day (probably never XD at least until the handles fall out). I guess if I were to improve it, I would construct the pull portion a little better, but whatever. it is serving its purpose now :P


I love how it turned out  :) 

even chanced upon a pen holder that might work either as a rubbish bin or laundry basket XD


I put it all in her new 'room'! apologies for the crappy photos, new space = me having to figure out all the lighting stuff :( GRAGHGHGHHGGh

She has a dollhouse too!!! a 1:48 dollhouse is perfect as a 1:12 version of a 1:4 dollhouse (uh yeah, that's how the math figures out :S)

and here's just a rough setup. I've since put more stuff in that she could use...so it's a lot more crowded and messy now XD

OKAY! Hope you've enjoyed this lengthy post. Comment please, so I don't feel as if I'm always talking to myself T_T